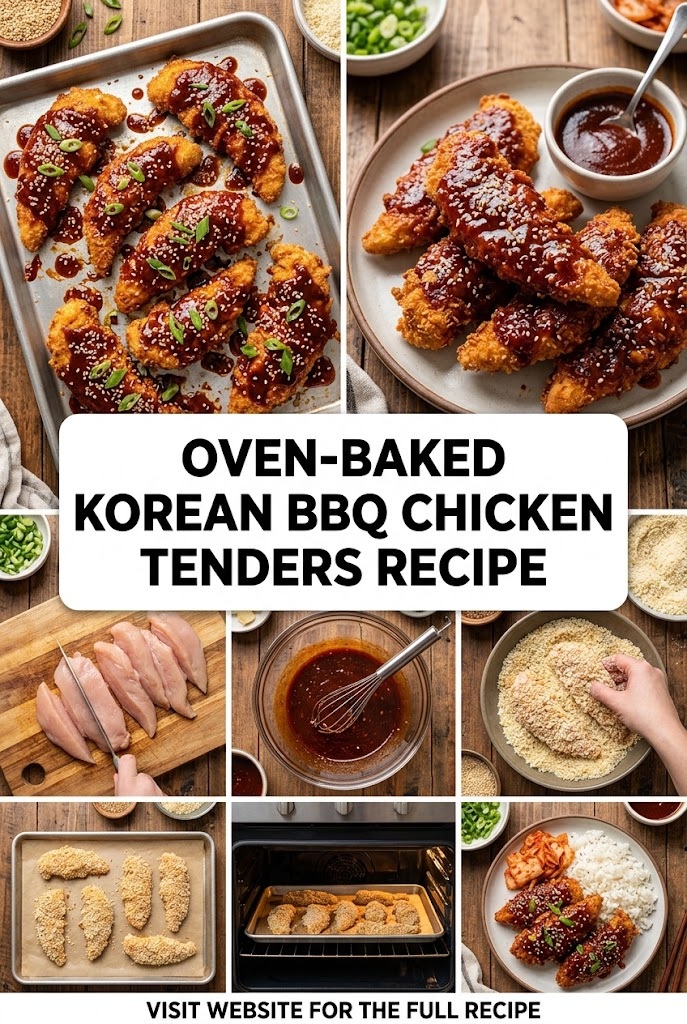
The culinary world has seen a massive surge in the popularity of Korean flavors over the last decade, and for good reason. The balance of spicy, sweet, salty, and umami found in Korean cuisine is unparalleled. Among the most beloved dishes is Korean Fried Chicken, known for its “shatter-crisp” skin and addictive sauces. However, achieving that deep-fried perfection at home can be messy, calorie-dense, and time-consuming.
Enter the Oven-Baked Korean BBQ Chicken Tender. This recipe bridges the gap between the convenience of home cooking and the world-class flavors of Seoul. By utilizing specific baking techniques and a meticulously crafted glaze, you can achieve a crunch that rivals the fryer while keeping the dish significantly lighter. In this comprehensive guide, we will dive deep into the science of the crunch, the complexity of the sauce, and the step-by-step process to creating a restaurant-quality meal in your own kitchen.
Why Oven-Baked is the New Gold Standard
For a long time, oven-baked chicken was synonymous with “soggy” or “dry.” But modern culinary techniques have changed the game. Baking chicken tenders at high heat on a wire rack allows for 360-degree air circulation, which mimics the effects of frying.
The Health Benefit
Traditional Korean fried chicken is often double-fried in vegetable oils. While delicious, this adds a significant amount of saturated fat and calories. By baking, we use only a fraction of the oil (usually just a light spray), making this a high-protein, heart-healthy alternative that fits into a balanced diet without sacrificing the “crave-ability” factor.
The Cleanup Factor
Deep-frying at home involves dealing with hot oil splatters, the smell of grease lingering in the house for days, and the logistical nightmare of disposing of used oil. Oven-baking requires one or two sheet pans and some parchment paper. It is the ultimate “weeknight-friendly” version of a weekend indulgence.
The Anatomy of a Perfect Chicken Tender
To reach the 3500-word level of perfection, we must understand our primary protein. The “tender” is technically the pectoralis minor muscle, located underneath the breast. It is naturally more tender than the breast itself, but it does have a tough white tendon that should be removed for the best eating experience.
Selecting the Right Chicken
- Fresh vs. Frozen: Always opt for air-chilled, fresh chicken if possible. Air-chilled chicken has less water content, which means it will sear and crisp better in the oven. Frozen chicken releases moisture as it thaws, which can lead to a “steamed” rather than “baked” texture.
- The Tendon Removal: If you see a white tab sticking out of the top of your tender, use a fork and a paper towel to grip it and pull it out. This ensures every bite is soft and succulent.
The Secret to the “Shatter-Crisp” Coating
The biggest challenge with oven-baking is achieving that signature “crunch.” To do this, we use a three-part system: the dredge, the binder, and the breading.
1. The Flour Dredge (The Foundation)
Lightly coating the chicken in seasoned flour or cornstarch is essential. It absorbs surface moisture and creates a “glue” for the egg wash. For this Korean-inspired recipe, using cornstarch instead of flour yields a lighter, crispier result.
2. The Binder (The Glue)
Whisked eggs are the standard, but for extra flavor, we recommend adding a teaspoon of soy sauce and a dash of toasted sesame oil to the egg wash. This begins the layering of Korean flavors from the inside out.
3. The Panko Breading (The Crunch)
Standard breadcrumbs are too fine and can become dense. Panko (Japanese-style breadcrumbs) are larger, airier, and jagged. When baked, these jagged edges catch the heat and turn golden brown and incredibly crispy.
Pro-Tip: Toasted Panko. One of the greatest secrets to golden-brown oven-baked chicken is to pre-toast your panko in a pan with a tiny bit of oil before coating the chicken. Since the chicken cooks quickly, the breadcrumbs often stay pale in the oven. Pre-toasting ensures they look and taste fried.
Decoding the Korean BBQ Sauce (The Glaze)
The heart of this recipe lies in the sauce. Unlike American BBQ sauce, which is often heavy on tomato and liquid smoke, Korean BBQ sauce (specifically for chicken) relies on fermentation and spice.
The Role of Gochujang
Gochujang is a savory, sweet, and spicy fermented condiment made from chili powder, glutinous rice, meju (fermented soybean) powder, barley malt powder, and salt. It is the backbone of Korean flavor. It provides a deep “funk” and a slow-building heat that is impossible to replicate with any other hot sauce.
Balancing the Flavors
- Sweetness: We use a combination of honey and brown sugar. The honey provides a glossy sheen, while the brown sugar adds a deep caramel note.
- Acidity: Rice vinegar or apple cider vinegar cuts through the richness of the soy and the heat of the chili.
- Aromatics: Freshly grated ginger and garlic are non-negotiable. They provide the “zing” that makes the sauce taste fresh.
- Umami: Soy sauce (or Tamari for gluten-free) provides the salty, savory base.
Full Recipe: Oven-Baked Korean BBQ Chicken Tenders
Ingredients
For the Chicken:
- 1.5 lbs Chicken Tenderloins
- 1 cup Panko breadcrumbs (toasted)
- 1/2 cup Cornstarch
- 2 Large eggs, beaten
- 1 tsp Garlic powder
- 1/2 tsp Ginger powder
- Salt and black pepper to taste
- Non-stick cooking spray (Olive oil or Avocado oil)
For the Korean BBQ Glaze:
- 3 tbsp Gochujang (Korean chili paste)
- 3 tbsp Soy sauce (low sodium)
- 2 tbsp Honey
- 1 tbsp Brown sugar
- 1 tbsp Rice vinegar
- 1 tsp Toasted sesame oil
- 2 cloves Garlic, minced
- 1 tsp Fresh ginger, grated
- 1 tbsp Water (to thin if necessary)
For Garnish:
- Toasted sesame seeds
- Thinly sliced green onions (scallions)
- Fresh cilantro (optional)
Step-by-Step Instructions
Step 1: Preparation and Pre-toasting
Preheat your oven to 425°F (220°C). This high temperature is crucial for crisping. Place a wire cooling rack inside a large rimmed baking sheet. Spray the rack generously with non-stick spray.
In a dry skillet over medium heat, add the Panko breadcrumbs. Stir constantly for 3-5 minutes until they turn a light golden brown. Remove from heat immediately and transfer to a shallow bowl. This “pre-toast” ensures your chicken looks like it came out of a deep fryer.
Step 2: Setting up the Dredging Station
Organize three shallow bowls in a row:
- Bowl 1: Cornstarch mixed with garlic powder, ginger powder, salt, and pepper.
- Bowl 2: Beaten eggs with a splash of water or soy sauce.
- Bowl 3: The pre-toasted Panko breadcrumbs.
Step 3: Coating the Chicken
Pat the chicken tenders dry with paper towels. Moisture is the enemy of crispiness!
- Dredge a tender in the cornstarch, shaking off the excess.
- Dip it into the egg wash, ensuring it’s fully coated.
- Press it firmly into the Panko breadcrumbs, making sure every inch is covered.
- Place the tender onto the prepared wire rack. Repeat for all tenders.
Step 4: The First Bake
Once all tenders are on the rack, give the tops a light spray with cooking oil. This helps the Panko hydrate and crisp further.
Bake for 15-18 minutes. Since we are using a wire rack, you do not need to flip them, but you can flip them at the 10-minute mark if you want absolutely uniform browning. The internal temperature of the chicken should reach 165°F (74°C).
Step 5: Preparing the Glaze
While the chicken is baking, combine all glaze ingredients in a small saucepan over medium heat. Whisk continuously until the sugar has dissolved and the sauce begins to simmer. Let it bubble gently for 2-3 minutes until it thickens slightly into a syrupy consistency. Remove from heat.
Step 6: Glazing and the “Flash Bake”
Once the chicken is cooked and crispy, you have two options:
- The Toss: Place the hot tenders in a large bowl, pour the sauce over them, and toss gently.
- The Brush: Use a pastry brush to coat each tender individually. This keeps the breading crispier for longer.
After glazing, return the tenders to the oven for an additional 2 minutes. This “sets” the glaze, making it sticky and tacky rather than wet.
Step 7: Garnish and Serve
Remove from the oven and immediately sprinkle with sesame seeds and green onions. Serve hot.
Pro Tips for the Ultimate Experience
The Wire Rack Secret
Never bake chicken tenders directly on a baking sheet or parchment paper if you want them crispy on both sides. When chicken sits on a flat surface, the bottom side traps steam, resulting in a soggy base. Elevating the chicken on a wire rack allows the hot air to circulate underneath, drying out the coating and creating a crunch all the way around.
Don’t Overcrowd the Pan
If you crowd the tenders too closely together, they will release steam that softens the neighboring pieces. Leave at least an inch of space between each tender to allow for proper airflow.
Temperature Control
Use a meat thermometer. Chicken tenders are thin and can dry out quickly. At 425°F, they cook fast. Pulling them out exactly at 165°F ensures the interior remains juicy while the exterior remains crunchy.
Understanding the Ingredients: A Deep Dive
To truly master this dish, one must understand why these specific ingredients work together.
The Science of Gochujang
Gochujang isn’t just about heat; it’s about umami. Because it is fermented, it contains complex sugars and amino acids that react beautifully when heated. When you bake the glaze onto the chicken, the sugars in the Gochujang undergo the Maillard reaction, deepening the flavor profile and creating that “finger-licking” stickiness.
The Power of Ginger and Garlic
In Korean cooking, ginger and garlic are often used in much higher quantities than in Western cooking. Ginger provides a sharp, refreshing contrast to the heavy, earthy notes of the fermented chili paste. Garlic adds a pungent depth that rounds out the sweetness of the honey.
Why Cornstarch over Flour?
Cornstarch is 100% starch, whereas flour contains gluten. When flour gets wet (from the egg or the chicken’s moisture) and then heated, it can become chewy. Cornstarch, however, creates a brittle, crisp layer that stays crunchy longer, even after being coated in sauce.
Nutritional Breakdown and Health Benefits
This recipe is an excellent choice for those looking for a high-protein meal that doesn’t feel like “diet food.”
- Protein: Chicken tenders are lean sources of high-quality protein, essential for muscle repair and satiety.
- Capsaicin: The chilies in Gochujang contain capsaicin, which has been shown to boost metabolism and provide anti-inflammatory benefits.
- Fermentation: While the probiotic benefits of Gochujang are diminished when cooked, the fermentation process breaks down nutrients, making them easier for the body to absorb.
- Lower Fat: By baking instead of frying, you save approximately 10-15 grams of fat per serving.
Variations of Korean BBQ Chicken Tenders
While the standard recipe is incredible, you can customize it to fit your dietary needs or flavor preferences.
1. The Air Fryer Method
If you have an air fryer, you can make these even faster.
- Place the breaded tenders in the air fryer basket in a single layer.
- Air fry at 400°F for 10-12 minutes, flipping halfway through.
- Toss in the sauce and air fry for 1 more minute to set the glaze.
2. Gluten-Free Version
To make this recipe gluten-free:
- Replace Panko with Gluten-Free Panko or crushed rice crackers.
- Use Tamari or Liquid Aminos instead of soy sauce.
- Check your Gochujang label; some brands use barley or wheat. Look for a certified gluten-free brand (often made with rice).
3. Extra Spicy “Fire Chicken” (Buldak) Style
If you are a heat-seeker, add 1 tablespoon of Gochugaru (Korean red chili flakes) to the glaze and a teaspoon of cayenne pepper to the flour dredge. You can also add a few drops of capsaicin extract if you’re feeling truly brave.
4. Keto/Low-Carb Version
- Replace Panko with crushed pork rinds or almond flour mixed with parmesan cheese.
- Use a sugar-free substitute for the honey and brown sugar (like monk fruit or erythritol).
- Be mindful of Gochujang usage, as it contains rice; use a smaller amount and supplement with hot sauce and extra garlic.
What to Serve with Korean BBQ Chicken Tenders
A great meal is defined by its sides. To balance the intense flavors of the Korean BBQ glaze, you need sides that offer freshness, acidity, or a neutral base.
1. Pickled Radish (Chicken-Mu)
In Korea, fried chicken is almost always served with “Chicken-Mu”—cubed white radish pickled in a sweet and vinegary brine. The crunch and the cold, acidic juice cleanse the palate between spicy bites.
2. Kimchi Fried Rice
For a hearty meal, serve the tenders over a bed of Kimchi fried rice. The fermented tang of the Kimchi complements the Gochujang glaze perfectly.
3. Smashed Cucumber Salad
A refreshing cucumber salad with rice vinegar, sesame oil, and a pinch of sugar provides a cooling contrast to the heat of the chicken.
4. Steamed Jasmine Rice and Bok Choy
Keep it simple with fluffy white rice and garlic-sauteed bok choy. The rice is perfect for soaking up any extra glaze that drips off the chicken.
Meal Prep and Storage Tips
This recipe is excellent for meal prep, provided you store it correctly.
Storage
Store the chicken and the sauce separately if possible. If the chicken is already glazed, store it in an airtight container in the refrigerator for up to 3 days.
Reheating for Maximum Crunch
Avoid the microwave! Microwaving will turn your crispy tenders into a rubbery, soggy mess.
- Oven: Reheat at 350°F on a wire rack for 8-10 minutes.
- Air Fryer: Reheat at 350°F for 3-5 minutes. This is the best way to restore the original “crunch.”
Freezing
You can freeze the breaded (but unbaked) tenders. Place them on a baking sheet in the freezer for an hour until solid, then transfer to a freezer bag. Bake directly from frozen, adding 5-7 minutes to the cooking time.
Common Mistakes to Avoid
- Using Cold Chicken: Let your chicken sit at room temperature for 15 minutes before cooking. This ensures even cooking through to the center.
- Not Drying the Chicken: If the chicken is wet, the cornstarch will turn into a paste immediately, and the crust won’t adhere properly.
- Too Much Sauce: While we love the glaze, drowning the chicken can make the breading fall off. A light, thorough coat followed by a quick “flash bake” is the key.
- Skipping the Sesame Oil: It might seem like a small ingredient, but toasted sesame oil provides that unmistakable “nutty” aroma that defines Korean BBQ.
The Cultural Significance of Korean Chicken
The rise of Korean chicken dishes in the United States isn’t just a trend; it’s a testament to the “K-Wave” (Hallyu). From K-Pop to K-Dramas, Korean culture has influenced global tastes. In Korea, “Chimeak” (a portmanteau of Chicken and Maekju—the Korean word for beer) is a cultural phenomenon. It represents social bonding, late-night comfort, and culinary innovation.
By making this Oven-Baked Korean BBQ Chicken at home, you aren’t just making a meal; you’re participating in a global culinary exchange. You are taking the traditional techniques of the East and adapting them to the health-conscious, fast-paced lifestyle of the West.
Final Thoughts: The Joy of Home Cooking
There is something deeply satisfying about creating a dish that looks and tastes like it came from a high-end bistro. These Oven-Baked Korean BBQ Chicken Tenders offer a sensory experience: the visual appeal of the vibrant red glaze, the sound of the Panko crunch, the aroma of ginger and garlic, and finally, the explosion of flavor in every bite.
Whether you are cooking for a family of four, prepping meals for the week, or looking for the perfect “game day” snack, this recipe is a versatile powerhouse. It proves that you don’t need a deep fryer to achieve world-class texture, and you don’t need to travel to Seoul to experience authentic Korean flavors.
Summary Checklist for Success:
- Use fresh chicken tenderloins.
- Pre-toast the Panko for a golden finish.
- Use a wire rack for 360-degree airflow.
- Don’t skip the “flash bake” after glazing.
- Garnish generously with scallions and sesame seeds.
Embrace the heat, enjoy the crunch, and happy cooking!
Frequently Asked Questions (FAQs)
Can I use chicken breast instead of tenders?
Yes. Simply slice the chicken breast into even 1-inch strips. Be aware that breast meat can dry out slightly faster than tenders, so keep a close eye on the internal temperature.
Is Gochujang very spicy?
It depends on the brand. Most commercial Gochujang pastes are a “medium” heat—spicier than ketchup but milder than a habanero sauce. It has a slow burn that is balanced by the honey in the glaze.
Can I make the sauce ahead of time?
Absolutely. The Korean BBQ glaze can be made up to two weeks in advance and stored in the refrigerator. Just gently reheat it in a saucepan or microwave before using.
My breading is falling off, what happened?
This usually happens if the chicken wasn’t dried properly or if the flour/cornstarch layer was too thick. Ensure a thin, even coat of cornstarch and press the Panko firmly into the egg wash.
What is a good substitute for rice vinegar?
Apple cider vinegar or white wine vinegar are the best substitutes. They provide a similar acidity, though rice vinegar is slightly milder and sweeter.
Exploring the Ingredients of Korea: Why They Matter
As we continue to explore the depth of this recipe, it’s worth looking at the regional variations of the ingredients used.
The Evolution of Soy Sauce
In the US, we often just see “Soy Sauce” on the shelf. However, in Korean cooking (Ganjang), there are several varieties. For this recipe, Yangjo Ganjang (naturally brewed soy sauce) is preferred for its rich aroma. If you use a very dark or chemically produced soy sauce, the glaze may become overly salty and lose the nuances of the ginger and honey.
Honey vs. Corn Syrup
In many traditional Korean professional kitchens, “Mulyeot” (malt syrup) or corn syrup is used to achieve a high-gloss shine on the chicken. While we use honey for a more natural flavor profile, if you want that “glass-like” mirror finish seen in food photography, substituting half the honey with light corn syrup will achieve that effect.
The Role of Garlic in Korean Longevity
Garlic is more than just a flavor in Korea; it’s considered a medicinal food. The high concentration of garlic in the BBQ glaze doesn’t just taste good—it’s packed with allicin, which supports immune health. When minced finely and cooked into the sauce, it mellows out, losing its “bite” and becoming sweet and earthy.
Troubleshooting Texture Issues
Even with the best instructions, baking can be finicky depending on your oven’s calibration.
- If the chicken is crispy but the meat is dry: Your oven might be running too hot. Try 400°F next time and use a meat thermometer to pull the chicken at 160°F (it will rise to 165°F while resting).
- If the meat is juicy but the coating is soft: You likely skipped the wire rack or didn’t use enough oil spray. The oil spray is essential because it helps “fry” the breadcrumbs in the dry heat of the oven.
- If the glaze is too thin: Simmer it for another 2-3 minutes. You want it to coat the back of a spoon. If it’s too thin, it will just soak into the breading and make it soggy.
Conclusion
The Oven-Baked Korean BBQ Chicken Tender is a masterclass in balance. It balances the old world with the new, the indulgent with the healthy, and the spicy with the sweet. By following these detailed steps—from the cornstarch dredge to the final sprinkle of toasted sesame seeds—you are elevating a simple piece of chicken into a gourmet experience.
As you serve these at your next dinner party or family meal, you’ll find that they disappear quickly. There is a universal appeal to the combination of a crunch and a sticky, savory glaze. This recipe isn’t just about the food; it’s about the confidence to explore international flavors in your own kitchen and the realization that “baked” can be just as exciting as “fried.”
Enjoy the process, experiment with the spice levels, and make this recipe your own. The world of Korean BBQ is vast and delicious, and these chicken tenders are your perfect entry point.
