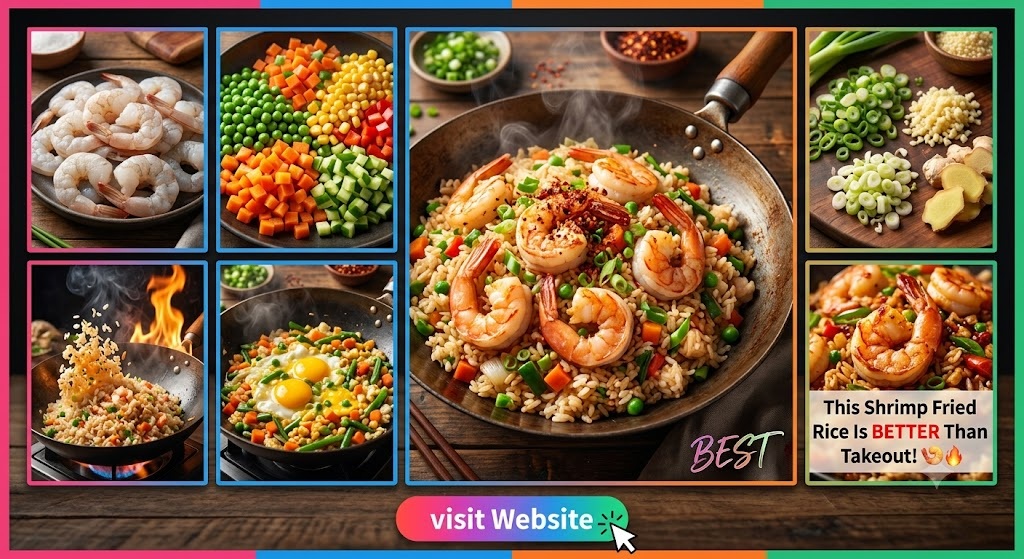
We’ve all been there. It’s 7:00 PM on a Tuesday, the fridge looks uninspiring, and the siren call of the local Chinese takeout joint starts ringing in your ears. You can almost taste the salty, savory, umami-packed goodness of a container of shrimp fried rice. But then you remember the last time you ordered: the shrimp were tiny and rubbery, the rice was a bit too oily, and the bill—with delivery fees and tips—was enough to make you wince.
What if I told you that the best shrimp fried rice you’ve ever had didn’t come in a white cardboard box? What if I told you that the secret to restaurant-quality rice isn’t a professional-grade jet-engine burner, but rather a few simple techniques that transform humble leftovers into a gourmet masterpiece?
This isn’t just a recipe; it’s a manifesto on texture, temperature, and timing. We are going to break down the chemistry of why day-old rice is non-negotiable, why the size of your shrimp matters more than you think, and how to achieve that smoky, charred “wok hei” (the breath of the wok) on a standard kitchen stove. Grab your apron, turn up the heat, and let’s redefine what “homemade” means.
The Foundation: Why This Recipe Outperforms the Competition
Most home-cooked fried rice fails for one of three reasons: it’s too wet, it’s too bland, or the textures are uneven. This recipe solves all three. By focusing on the “dry-sear” method and a layered seasoning approach, we ensure every single grain of rice is coated in flavor without becoming a soggy mess.
Shrimp Fried Rice Better Than Takeout
If you’re craving restaurant-style shrimp fried rice, this homemade version is packed with juicy shrimp, fluffy rice, colorful vegetables, and savory flavors. The secret is using cold, day-old rice and cooking everything over high heat for that classic takeout taste. Best of all, this recipe is ready in about 30 minutes.
Why You’ll Love This Recipe
- Better than restaurant takeout
- Ready in just 30 minutes
- One-pan meal
- Loaded with protein
- Budget-friendly
- Perfect for meal prep
- Easy to customize
Ingredients
For the Fried Rice
- 1 pound (450g) large shrimp, peeled and deveined
- 4 cups cooked jasmine rice (cold, day-old rice works best)
- 2 tablespoons vegetable oil
- 2 eggs, lightly beaten
- 1 cup frozen peas and carrots
- 3 green onions, sliced
- 3 cloves garlic, minced
- 1 teaspoon fresh ginger, minced (optional)
- 3 tablespoons soy sauce
- 1 tablespoon oyster sauce
- 1 teaspoon sesame oil
- ½ teaspoon white pepper
- Salt, to taste
Optional Garnishes
- Sesame seeds
- Extra sliced green onions
- Chili flakes
- Sriracha sauce
- Lime wedges
Kitchen Equipment
- Large wok or skillet
- Spatula
- Mixing bowls
- Measuring spoons
- Cutting board
- Sharp knife
Preparation Time
- Prep Time: 15 minutes
- Cook Time: 15 minutes
- Total Time: 30 minutes
Servings: 4
How to Cook Shrimp Fried Rice (Step-by-Step)
Step 1: Prepare the Rice
Use cold, day-old rice. Break apart any clumps with your hands or a fork so the grains separate easily during cooking.
Tip: Fresh rice is too moist and can become mushy.
Step 2: Season the Shrimp
Pat the shrimp dry with paper towels.
Season lightly with:
- A pinch of salt
- White pepper
Set aside for 5 minutes.
Step 3: Cook the Eggs
Heat 1 tablespoon oil in a large wok over medium-high heat.
Pour in the beaten eggs.
Cook until just set, then gently scramble.
Transfer to a plate.
Step 4: Cook the Shrimp
Add another tablespoon of oil.
Arrange shrimp in a single layer.
Cook for about:
- 1–2 minutes per side
They should turn pink and slightly golden.
Remove from the pan.
Do not overcook.
Step 5: Cook the Aromatics
Add garlic and ginger.
Stir-fry for 30 seconds until fragrant.
Step 6: Add Vegetables
Add peas and carrots.
Cook for 2–3 minutes until heated through.
Step 7: Fry the Rice
Increase heat to high.
Add the cold rice.
Break apart any remaining clumps.
Stir-fry for 3–4 minutes until the rice becomes hot and lightly toasted.
Step 8: Add the Sauces
Pour over:
- Soy sauce
- Oyster sauce
- Sesame oil
Mix thoroughly so every grain is coated evenly.
Step 9: Combine Everything
Return:
- Cooked shrimp
- Scrambled eggs
Add sliced green onions.
Toss everything together for 1–2 minutes.
Taste and adjust seasoning if needed.
Step 10: Serve
Serve immediately while hot.
Top with:
- Sesame seeds
- Green onions
- Chili flakes
- Sriracha, if desired
Enjoy!
Chef’s Tips for Better Than Takeout Fried Rice
Use Cold Rice
Day-old rice is firmer and fries beautifully without becoming sticky.
Cook Over High Heat
High heat gives fried rice its signature smoky flavor.
Don’t Overcrowd the Pan
Cook in batches if necessary to prevent steaming.
Dry the Shrimp
Removing excess moisture helps the shrimp develop a light golden sear.
Add Sauce Gradually
Too much soy sauce can make the rice soggy and overly salty.
Delicious Variations
Spicy Shrimp Fried Rice
Add:
- 1 teaspoon chili garlic sauce
- Crushed red pepper flakes
Garlic Butter Shrimp Fried Rice
Add 2 tablespoons butter near the end of cooking for a rich, savory finish.
Pineapple Shrimp Fried Rice
Stir in:
- 1 cup diced pineapple
- Roasted cashews
Healthy Version
Replace white rice with:
- Brown rice
- Cauliflower rice
Add extra vegetables like broccoli, bell peppers, or spinach.
What to Serve with Shrimp Fried Rice
- Egg rolls
- Vegetable spring rolls
- Hot and sour soup
- Wonton soup
- Steamed broccoli
- Asian cucumber salad
- Garlic green beans
Storage Instructions
Allow leftovers to cool completely.
Store in an airtight container in the refrigerator for up to 3 days.
Freezing Instructions
Freeze in freezer-safe containers for up to 2 months.
Thaw overnight in the refrigerator before reheating.
Reheating
Microwave
Heat for 2–3 minutes, stirring halfway through.
Stovetop
Reheat in a skillet over medium heat with a splash of water or a little oil until warmed through.
Nutrition Information (Approximate Per Serving)
- Calories: 430
- Protein: 29g
- Carbohydrates: 39g
- Fat: 16g
- Saturated Fat: 3g
- Cholesterol: 220mg
- Fiber: 3g
- Sugar: 3g
- Sodium: 790mg
Nutrition values are estimates and may vary based on the ingredients used.
Frequently Asked Questions
Can I use freshly cooked rice?
Yes, but let it cool completely and refrigerate it for at least 1–2 hours before frying. Cold rice produces the best texture.
What size shrimp should I use?
Medium to large shrimp (31–40 or 21–25 count per pound) work best because they stay juicy and cook quickly.
Can I use frozen shrimp?
Absolutely. Thaw the shrimp completely and pat them dry before cooking to avoid excess moisture.
What is the best rice for fried rice?
Jasmine rice is a favorite because it has a light, fluffy texture and absorbs flavors well. Long-grain white rice also works great.
Can I make this recipe gluten-free?
Yes. Use gluten-free soy sauce (such as tamari) and a gluten-free oyster sauce substitute.
Final Thoughts
This Shrimp Fried Rice Better Than Takeout recipe delivers everything you love about restaurant-style fried rice—tender shrimp, fluffy rice, colorful vegetables, and bold savory flavor—all made fresh in your own kitchen. With simple ingredients, quick preparation, and easy customization, it’s a dependable weeknight meal that tastes even better than ordering out. Use cold rice, cook over high heat, and avoid overcrowding the pan for the best results every time.
Essential Ingredients for Shrimp Fried Rice Excellence
To make the world’s best shrimp fried rice, you need to be picky about your components. Here is the breakdown of what you’ll need and, more importantly, why you need it.
1. The Rice (The Most Critical Element)
You want long-grain white rice, specifically Jasmine rice. Jasmine has a beautiful floral aroma and, when cooked correctly, grains that stay distinct rather than clumping together like short-grain sushi rice.
- The Golden Rule: It MUST be cold, day-old rice. Freshly cooked rice contains too much moisture. When it hits the hot pan, that moisture turns to steam, and steam turns your fried rice into mushy porridge. By letting the rice sit in the fridge overnight, the grains dehydrate slightly and the starches “retrograde,” making them firm and perfect for frying.
2. The Shrimp
Go for “Large” or “Jumbo” (21-25 or 16-20 count per pound). Small salad shrimp disappear in the dish and overcook in seconds. Raw, peeled, and deveined shrimp are best. If they have the tails on, remove them before cooking for a better eating experience—nobody wants to be picking tails out of their rice mid-bite.
3. The Aromatics
- Garlic: Freshly minced. Do not use the stuff from a jar; it has an acidic aftertaste that ruins the delicate balance of the dish.
- Ginger: A teaspoon of freshly grated ginger adds a bright, spicy undertone that cuts through the richness of the oil.
- Green Onions (Scallions): We use both the white parts (for frying) and the green parts (for garnish).
4. The Vegetables
Classic takeout uses peas and carrots. I recommend using a frozen pea and carrot mix—not because it’s easier (though it is), but because frozen peas retain their vibrant green color and “pop” better than fresh ones that might get starchy during a long sauté.
5. The Liquid Gold (The Sauce)
- Soy Sauce: Use a high-quality brewed soy sauce. If you can find “Dark Soy Sauce,” add a teaspoon for that deep mahogany color seen in restaurants.
- Oyster Sauce: This is the secret ingredient. It adds thickness, sweetness, and a massive umami boost.
- Toasted Sesame Oil: This is a finishing oil. Never fry with it, as it has a low smoke point and turns bitter. A drizzle at the end provides that iconic aroma.
- Shaoxing Wine (Optional): A splash of Chinese cooking wine adds a professional depth of flavor. Dry sherry is a good substitute.
6. The Fat
You need an oil with a high smoke point. Avocado oil, grapeseed oil, or standard vegetable oil works perfectly. Do not use butter (until the very end, if you want a Japanese-steakhouse twist) or extra virgin olive oil.
The Toolkit: Do You Really Need a Wok?
While a carbon steel wok is the traditional tool for the job, you can absolutely make incredible shrimp fried rice in a large cast-iron skillet or a heavy-bottomed non-stick pan.
The key isn’t the shape of the pan; it’s the surface area and heat retention. You want a pan large enough that the rice can spread out and make contact with the heat. If you crowd the pan, the temperature drops, and you end up steaming the food instead of frying it.
Step-by-Step Instructions: Mastering the Technique
Follow these steps closely. In Chinese cooking, the “mise en place” (having everything prepped and ready) is 90% of the work. The actual cooking takes less than ten minutes.
Step 1: Prep the Rice
Take your cold rice out of the fridge. Use clean hands to break up any large clumps. You want individual grains before they ever touch the pan.
Step 2: Sear the Shrimp
Pat your shrimp dry with paper towels. Moisture is the enemy of a good sear! Season them lightly with salt and white pepper. Heat 1 tablespoon of oil in your wok over high heat until it’s shimmering and just starting to smoke. Add the shrimp in a single layer. Let them sear undisturbed for 60-90 seconds until a golden crust forms, then flip. Once they are pink and opaque (about 2-3 minutes total), remove them from the pan immediately. Overcooked shrimp are rubbery; we will add them back at the end to warm through.
Step 3: The Egg Scramble
Add another tablespoon of oil if the pan looks dry. Whisk 2-3 eggs with a pinch of salt and pour them into the center. Let them set for a few seconds, then soft-scramble them. You want them slightly underdone because they will continue to cook later. Remove the eggs and set them aside with the shrimp.
Step 4: Aromatics and Veggies
Wipe out the pan if there are any burnt egg bits. Add more oil. Toss in the white parts of the green onions, the minced garlic, and the grated ginger. Stir-fry for only 30 seconds—just until fragrant. Add the frozen peas and carrots. Sauté for 2 minutes until the moisture from the frozen veggies has evaporated.
Step 5: The Great Fry
This is the moment of truth. Crank the heat to its highest setting. Add the rice to the pan. Using a spatula, press the rice into the bottom of the pan, let it sit for 30 seconds to get a little crispy, then toss and repeat. You should hear the rice “popping.” This is the sound of the moisture leaving the grain and the edges caramelizing.
Step 6: Seasoning
Drizzle the soy sauce, oyster sauce, and Shaoxing wine (if using) around the edges of the wok rather than directly onto the rice. This “burns” the sauce slightly as it slides down into the rice, creating a deeper, more complex flavor. Toss everything vigorously to ensure the rice is evenly coated.
Step 7: The Reunion
Add the cooked shrimp and scrambled eggs back into the pan. Toss for another minute to incorporate everything and ensure it’s all piping hot.
Step 8: The Finishing Touch
Turn off the heat. Drizzle with a teaspoon of toasted sesame oil and throw in a handful of the sliced green onion tops. Give it one last toss. Taste it—does it need a pinch of sugar to balance the salt? A little more soy? Trust your palate.
Pro-Tips for the Home Chef
- The “Butter” Secret: Many Japanese-style hibachi restaurants add a tablespoon of unsalted butter at the very end of the cooking process. It adds a silky mouthfeel and a richness that pairs incredibly well with shrimp.
- White Pepper vs. Black Pepper: Use ground white pepper for an authentic “clean” heat. Black pepper can be a bit too floral and distracting in this specific dish.
- Don’t Over-Sauce: The rice should be seasoned, not swimming. If the rice looks wet or heavy, you’ve used too much liquid. The goal is “fried,” not “stewed.”
- The Power of MSG: If you want that exact restaurant taste, add a tiny pinch of Monosodium Glutamate (MSG) or a dash of chicken bouillon powder. It’s the “je ne sais quoi” of takeout.
Common Mistakes to Avoid
- Using Warm Rice: I cannot stress this enough. If you use warm rice, your dish will fail. If you forgot to make rice yesterday, spread freshly cooked rice onto a baking sheet and put it in front of a fan for 30 minutes, or in the freezer for 15, to dry it out.
- Low Heat: Fried rice is a high-heat sport. If your stove isn’t hot enough, the rice will soak up the oil and become greasy rather than crispy.
- Too Much Stirring: Let the rice sit against the hot metal! That’s where the flavor lives. Constant stirring prevents caramelization.
- Crowding the Pan: If you’re doubling the recipe, cook it in two batches. Trying to make a mountain of fried rice in one small pan results in uneven cooking and soggy grains.
Flavor Variations to Keep Things Exciting
Once you master the basic technique, the world is your oyster (sauce). Here are a few ways to switch it up:
- Spicy Szechuan Shrimp Fried Rice: Add a tablespoon of Chili Crisp or Sambal Oelek during the aromatic stage.
- Thai-Style Pineapple Fried Rice: Add chunks of fresh pineapple, a splash of fish sauce instead of some of the soy sauce, and top with toasted cashews.
- “Young Chow” Style: Add diced Chinese BBQ pork (char siu) along with the shrimp for a meat-lover’s version.
- Healthy Swap: Use cold, cooked brown rice or even quinoa. Note that brown rice requires a bit more oil as it is naturally drier.
Best Side Dishes to Serve with Shrimp Fried Rice
While this is a complete meal on its own, you can turn it into a full banquet by pairing it with:
- Garlic Smashed Cucumbers: The cold, vinegary crunch is a perfect foil to the warm, savory rice.
- Egg Drop Soup: A light, silky starter.
- Crispy Spring Rolls: For that authentic takeout experience.
- Steamed Bok Choy: To get those leafy greens in.
Storage and Reheating Tips
Shrimp fried rice makes for incredible leftovers.
- To Store: Let the rice cool completely before transferring it to an airtight container. It will stay fresh in the refrigerator for up to 3 days.
- To Reheat: The microwave is fine, but for the best results, toss the leftovers back into a hot skillet with a teaspoon of water. The steam from the water will fluff the rice back up without making it soggy.
- Freezing: You can freeze fried rice! Place it in a freezer bag, flatten it out to remove air, and freeze for up to a month. Reheat directly from frozen in a pan.
Nutritional Overview
Shrimp is a fantastic source of lean protein, making this one of the healthier “comfort foods” you can make. By making it at home, you control the sodium levels and the quality of the oil. One serving typically provides a good balance of complex carbohydrates, protein, and essential fats.
| Nutrient | Per Serving (Approximate) |
|---|---|
| Calories | 450 kcal |
| Protein | 25g |
| Carbohydrates | 55g |
| Fat | 14g |
| Fiber | 3g |
Frequently Asked Questions
Can I use frozen shrimp? Absolutely. In fact, most “fresh” shrimp at the grocery store was previously frozen. Just make sure to thaw them completely in the fridge and pat them very dry before cooking.
What if my rice is still clumpy? If your day-old rice is stuck in a big brick, drizzle a tiny bit of oil on your hands and massage the rice. The oil helps separate the grains without breaking them.
Can I use a different protein? This technique works perfectly for chicken, beef, or tofu. Just adjust the cooking time for the protein accordingly. Chicken breast will take slightly longer than shrimp; tofu should be pressed and seared until golden.
Is it okay to use salted butter? If you choose to use the “hibachi butter trick,” use unsalted butter. The soy sauce and oyster sauce already provide a significant amount of salt, and you want to be able to control the seasoning yourself.
Why does my fried rice look pale? A pale color usually means you didn’t use enough soy sauce or didn’t use dark soy sauce. However, color doesn’t always equal flavor! Taste it first. If it tastes great, don’t worry about the aesthetics. If it’s bland, add a touch more soy sauce or a pinch of salt.
Can I add more vegetables? Yes! Bell peppers, snap peas, corn, and baby corn are all great additions. Just remember to cook them in small batches so the pan stays hot.
Final Thoughts: The Joy of the Homemade Wok
There is something deeply satisfying about hearing the clink of a spatula against a pan and seeing steam rise from a pile of perfectly seasoned rice. Making shrimp fried rice at home isn’t just about saving money or eating healthier—it’s about the mastery of a craft.
The first time you achieve that perfect balance of textures—the snap of the shrimp, the tender-chew of the rice, and the soft fluff of the egg—you’ll realize that your kitchen has always had the potential to be your favorite restaurant.
So, next time the craving hits, skip the app. Reach for that container of rice you strategically left in the fridge last night, and get to frying. You’ve got this!
Summary Checklist for Success:
- Use long-grain Jasmine rice cooked at least 12-24 hours in advance.
- Ensure shrimp are dry before searing.
- Prep all ingredients before turning on the stove.
- Use high heat and a high-smoke-point oil.
- Don’t forget the oyster sauce for that “extra” something.
- Garnish with fresh green onions for a pop of color and flavor.
Conclusion
Shrimp fried rice is a culinary icon for a reason. It is the ultimate “fridge-cleaner” that manages to taste like a luxury. By respecting the ingredients and following these professional techniques, you can elevate this simple dish into a staple of your weekly rotation. Whether you’re cooking for a crowd or just treating yourself to a solo weeknight feast, this “better than takeout” version is guaranteed to impress. Happy cooking!
